Spring Boot Remote JMX
March 05, 2019
Debugging applications is a key part in any developer's toolkit. Debugging applications in non-development environment is an even harder and more difficult challenge. It is only after your production application crashes, or you find yourself spending many hours (or days) trying to reproduce the customer's state in your local development environment, you understand how worthwhile it is to be able to inspect live apps.
Java, and it's underlining JVM, allows you to tap into the running JVM process, and besides monitoring and instrumenting, you are also able to use JMX and remote JMX to control and configure your application.
We have several Java applications in our workplace, one of them is a Spring Boot Application. Spring Boot is a powerful framework built on top of Spring, allowing easy, out-of-the-box, powerful bootstrap for a Java app. Another awesome feature of Spring Boot is it's vast range of plugins. A very helpful one is Spring Boot Actuator. It adds numerous debug and management endpoints, controlled via HTTP or JMX beans.
In this article we'll bootstrap a Spring Boot web application with a single endpoint. We'll run and test it locally, including using JConsole to profile the application. Then we'll spin up a remote machine (I'll use an AWS EC2 machine), copy the packaged JAR to it, and redo the previous steps, but now remotely.
Bootstrapping a Spring Boot app
My favorite goto place to bootstrap a Spring Boot app (besides copying the skeleton of an existing project) is Spring Initializr. You will need Java 11 installed on your development machine for this to work.
For this demo, I selected Java 11, Gradle, and the Spring Boot version 2.1.3, with modules of Reactive Web, Security and Actuator.
We are not going to deep dive into any of these modules, so feel free to pick your other favorite modules.

Click on "Generate Project" - you will download a demo.zip which you should unzip somewhere. This will be our working directory.
I use Jetbrains IntelliJ IDEA as my IDE of choice, but feel free to use your favorite editor. Opening this project in IntelliJ IDEA should be a breeze (Everything is automatically setup for you). This should be your directory structure:

Running this application is easy (although it won't do much), but important to see that everything compiles.
Open DemoApplication.java and click on the little green arrow next to the class. Then "Run Application".
This should automatically start your application which should by default serve at port 8080.
Our application currently doesn't do much, but we can interact with it's actuator endpoints, for example:
$ http :8080/actuator/health
HTTP/1.1 200 OK
Cache-Control: no-cache, no-store, max-age=0, must-revalidate
Content-Length: 15
Content-Type: application/vnd.spring-boot.actuator.v2+json;charset=UTF-8
Expires: 0
Pragma: no-cache
Referrer-Policy: no-referrer
X-Content-Type-Options: nosniff
X-Frame-Options: DENY
X-XSS-Protection: 1 ; mode=block

{
    "status": "UP"
}
And just for the fun of it, let's add an application information property. Add info.app.kewl=aid to application.properties.
(For a better deep-dive into actuator's info, see this guide).
Now let's query the info api:
$ http :8080/actuator/info
HTTP/1.1 200 OK
Cache-Control: no-cache, no-store, max-age=0, must-revalidate
Content-Length: 22
Content-Type: application/vnd.spring-boot.actuator.v2+json;charset=UTF-8
Expires: 0
Pragma: no-cache
Referrer-Policy: no-referrer
X-Content-Type-Options: nosniff
X-Frame-Options: DENY
X-XSS-Protection: 1 ; mode=block

{
    "app": {
        "kewl": "aid"
    }
}
Next step is to add a custom HTTP endpoint, create a new Java file named DemoController.java and paste this code:
package com.example.demo;

import org.springframework.web.bind.annotation.GetMapping;
import org.springframework.web.bind.annotation.RestController;
import reactor.core.publisher.Mono;

@RestController
public class DemoController {

    @GetMapping("/ping")
    public Mono<String> ping() {
        return Mono.just("pong");
    }
}
As you can see, this amazingly sophisticated code awaits the user's /ping requests, and responds with a quick pong
$ http :8080/ping
HTTP/1.1 401 Unauthorized
Cache-Control: no-cache, no-store, max-age=0, must-revalidate
Expires: 0
Pragma: no-cache
Referrer-Policy: no-referrer
WWW-Authenticate: Basic realm="Realm"
X-Content-Type-Options: nosniff
X-Frame-Options: DENY
X-XSS-Protection: 1 ; mode=block
content-length: 0
Wait no... What's going on here? Because the fine people at Spring Boot believe in creating production grade application without
a big hassle, and because we added Spring Boot Security, all of our endpoints (including all of Actuator's endpoints besides info and health) are
protected by default. This is a great start, although a minor slowdown for us on this quick demo. The reason I opted to use it, is
because I find most guides skip this part, although it's a crucial part of any production application.
Because we haven't configured anything security related, Spring Boot Security uses the default user user, and the randomly generated password
is outputted when Spring Boot boots. The line to look for is this:
Using generated security password: 9d3a723f-2e2a-4a3e-a819-4ba06c99f9ba
To actually get a pong response from our API, we'll need to authenticate but no need to worry, it's easy:
$ http -a 'user:9d3a723f-2e2a-4a3e-a819-4ba06c99f9ba' :8080/ping
HTTP/1.1 200 OK
Cache-Control: no-cache, no-store, max-age=0, must-revalidate
Content-Length: 4
Content-Type: text/plain;charset=UTF-8
Expires: 0
Pragma: no-cache
Referrer-Policy: no-referrer
X-Content-Type-Options: nosniff
X-Frame-Options: DENY
X-XSS-Protection: 1 ; mode=block

pong
Nice.
Creating and running a packaged JAR
Next step will be to create and run a packaged JAR, ready for deployment. Simply run gradle build. You will now have
the carefully crafted build/libs/demo-0.0.1-SNAPSHOT.jar. We'll run this JAR manually to see that everything still works:
(Don't forget to stop your application in IntelliJ to free up the port)
java -jar build/libs/demo-0.0.1-SNAPSHOT.jarYou can try out the previous endpoints to verify everything still works as it should. This jar is ready for deployment (It contains all required dependencies, and our application compiled class off course).
Using JConsole on a local process
Keep the application running. Let's use jconsole (bundled with Java) to profile it while it's running locally. No extra setup is required, run jconsole
in your shell, and find your running application jar in the list of local processes.
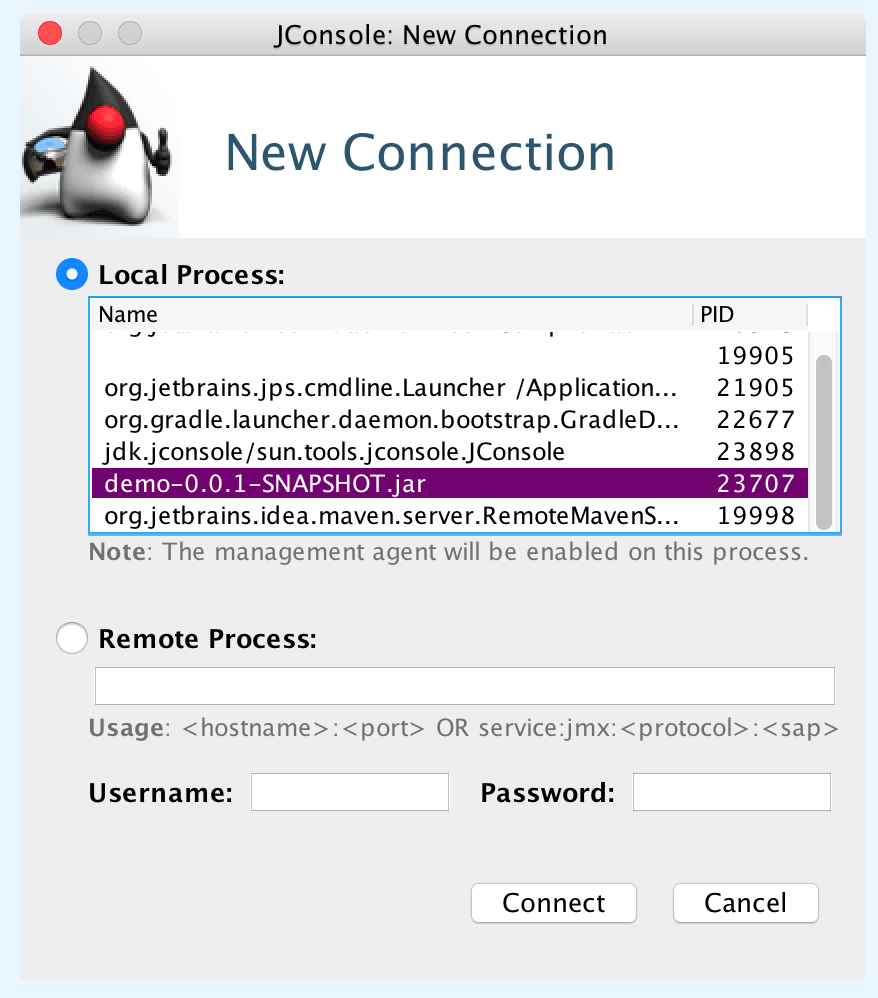
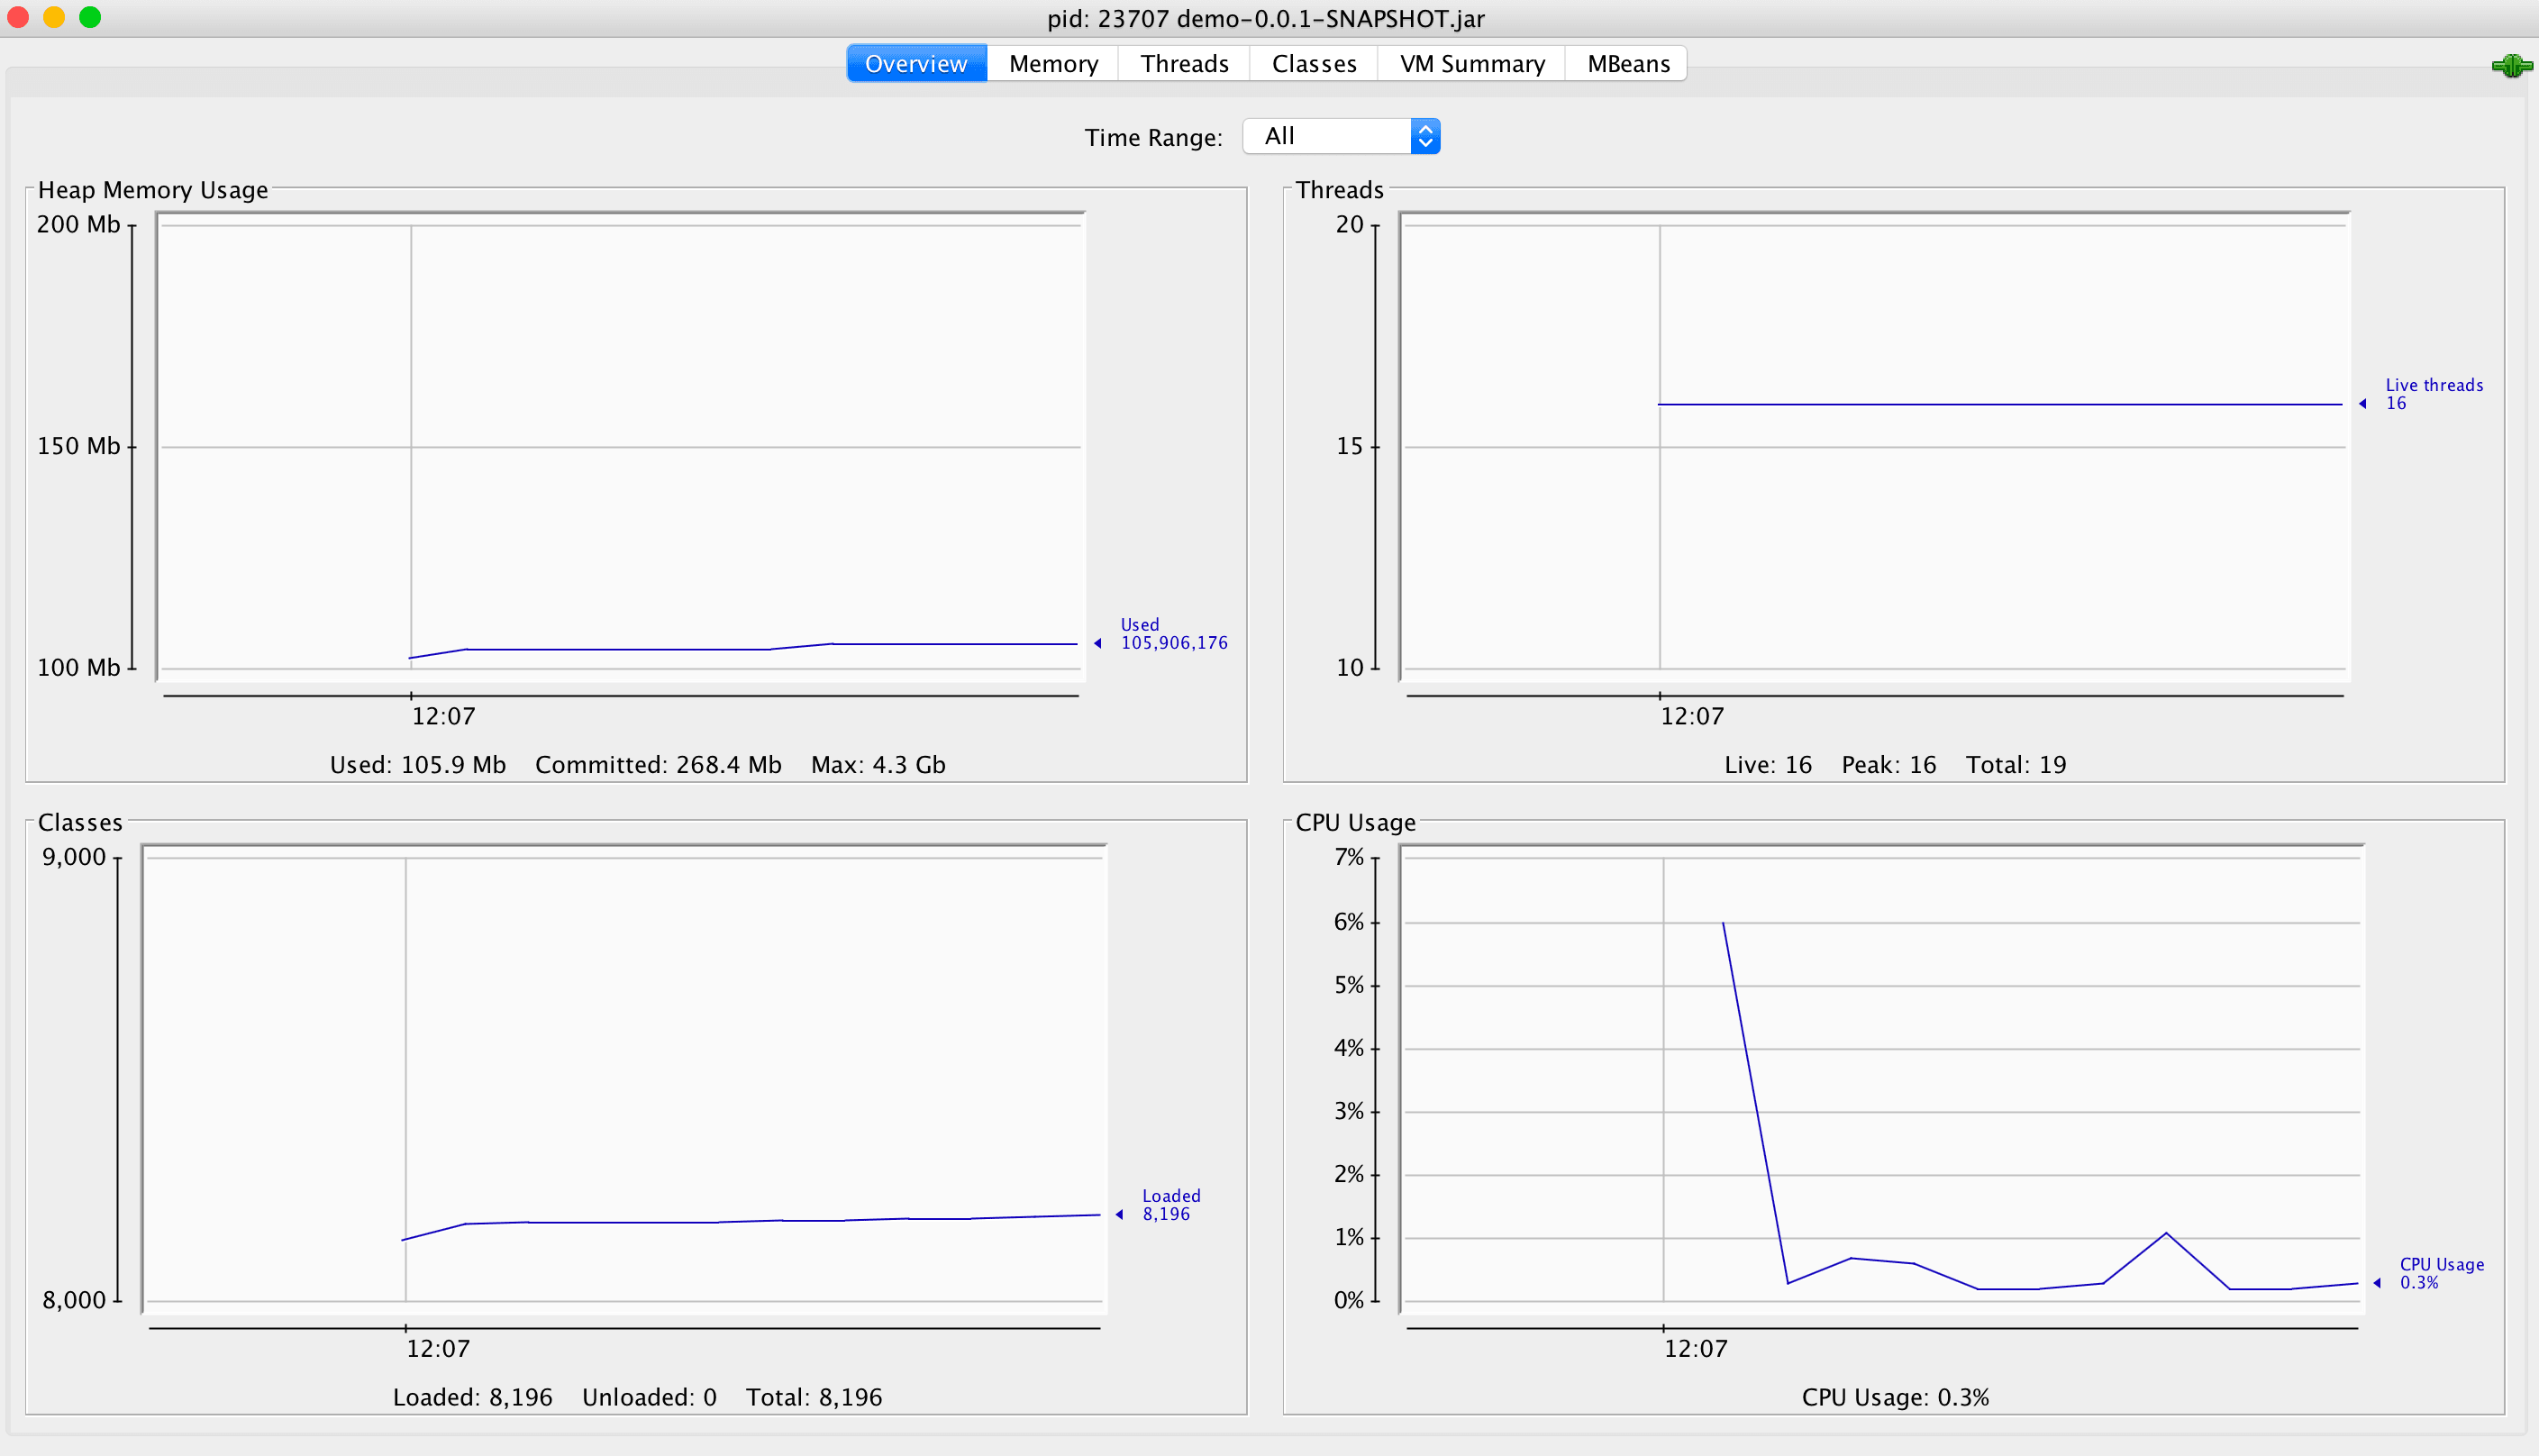
Click on "Insecure Connection" when you are bothered with a confirm window. You will see an overview of your application performance:
Another very interesting feature, is the MBeans (managed beans). This will allow us to interact with our Actuator endpoints.
Please notice that Spring Boot > 2.2.x disables JMX exposure by default and that you will need to add the following setting to make it work:
spring.jmx.enabled=true(Thanks Christian Bach who added this tip)
For example if we invoke our ping endpoint (Don't forget to swap the password to the new password), then we can see a list of recent traces that Spring Boot Actuator traced.
This is found under the tab MBeans -> org.springframework.boot -> Endpoint -> Httptrace -> Operations.
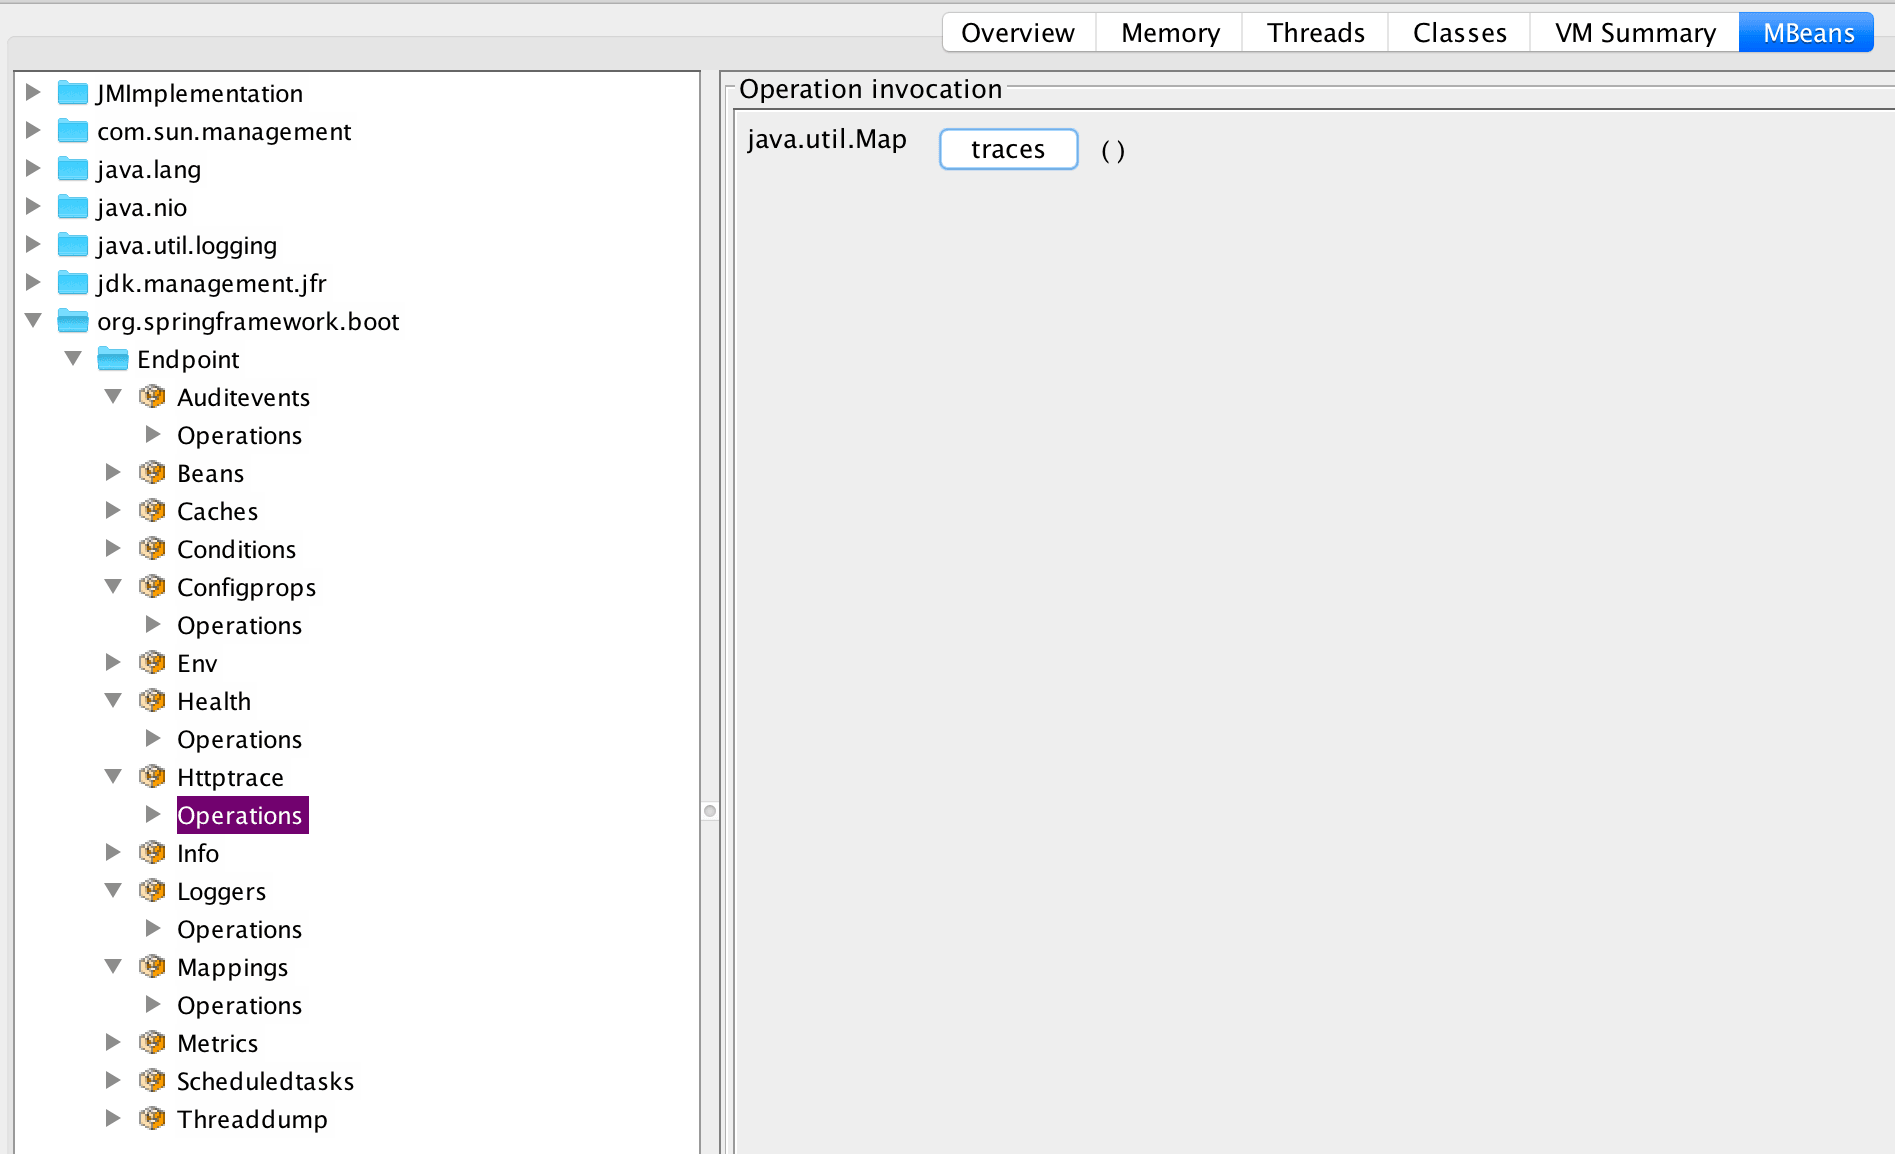
When you click on trace, this invokes the trace endpoint using JMX, which should show you something like this:
traces=[
    {
        timestamp=2019-03-05T10:12:09.546199Z,
        principal=null,
        session=null,
        request={method=GET, uri=http://localhost:8080/ping, headers={Accept=[*/*], User-Agent=[HTTPie/1.0.2], Connection=[keep-alive], Host=[localhost:8080], Accept-Encoding=[gzip, deflate]}, remoteAddress=null},
        response={status=200, headers={X-Frame-Options=[DENY], Referrer-Policy=[no-referrer], transfer-encoding=[chunked], Cache-Control=[no-cache, no-store, max-age=0, must-revalidate], X-Content-Type-Options=[nosniff], Pragma=[no-cache], Expires=[0], Content-Length=[4], X-XSS-Protection=[1 ; mode=block], Content-Type=[text/plain;charset=UTF-8]}},
        timeTaken=45
    }]
which is a list of recent traces, the most recent (and only one) is the ping API I invoked. Very handy for debugging.
Running our application remotely
So for this part I spin up an EC2 machine, feel free to choose your own cloud poison (or any remote machine). Make sure that your security
group allows incoming tcp on port 8080 (our current server port), and 9090 (for remote JMX).
Also, needless to say, make sure you can ssh into the machine (port 22 using ssh).
I dislike having to manually use the remote machine's ip (or address), and enter all kinds of ssh information (username, security key), I configure
the machine in my ~/.ssh/config file:
Host server
    HostName ec2-11-11-111-111.eu-west-1.compute.amazonaws.com
    User ubuntu
    IdentityFile ~/.ssh/key.pem
Then you can easily ssh into the machine using ssh server without all the extra ceremonial hassle. I update dependencies and install Java 11. That is the
only requirement.
Next step would be to copy the jar file we created on the previous steps to the remote machine. This is again easily doing using scp:
$ ssh server
$ mkdir -p app
$ exit
$ scp build/libs/demo-0.0.1-SNAPSHOT.jar server:app
This will copy the jar to the folder ~/app in the remote machine. Let's run it and make sure everything works remotely:
$ ssh server
$ java -jar ~/app/demo-0.0.1-SNAPSHOT.jar
Our server should boot app and we can test that our endpoints are working again, remotely. If your request is getting stuck, it could be that your security group isn't allowing it, or some firewall issues.
$ http 11.11.111.111:8080/actuator/info
HTTP/1.1 200 OK
Cache-Control: no-cache, no-store, max-age=0, must-revalidate
Content-Length: 22
Content-Type: application/vnd.spring-boot.actuator.v2+json;charset=UTF-8
Expires: 0
Pragma: no-cache
Referrer-Policy: no-referrer
X-Content-Type-Options: nosniff
X-Frame-Options: DENY
X-XSS-Protection: 1 ; mode=block

{
    "app": {
        "kewl": "aid"
    }
}
And that is not the real IP off course. Our application is now up and running ready to serve real users
Remote JMX
There are multiple ways to configure remote JMX, but all of them require us to boot up the application with some System Properties. We will examine 2 ways to connect remotely:
- Over the internet using an IP
- Using local port forwarding (a.k.a tunneling)
For both of them, as an extra precaution, we'll setup remote JMX authentication. If you connect over the internet (using an IP) I also recommend you setup SSL as well.
Connecting remotely over an IP
For this step we'll first create a startup script that helps us with automating the booting of our application.
Create a new file in the remote machine named run-public.sh:
#!/usr/bin/env bash

set -euo pipefail

RMI_HOST=$(wget -q -O - http://169.254.169.254/latest/meta-data/public-hostname)

java -Dcom.sun.management.jmxremote \
	-Djava.net.preferIPv4Stack=true \
	-Djava.rmi.server.hostname=${RMI_HOST} \
	-Dcom.sun.management.jmxremote.local.only=false \
	-Dcom.sun.management.jmxremote.port=9010 \
	-Dcom.sun.management.jmxremote.rmi.port=9010 \
	-Dcom.sun.management.jmxremote.authenticate=true \
	-Dcom.sun.management.jmxremote.password.file=jmxremote.password \
	-Dcom.sun.management.jmxremote.access.file=jmxremote.access \
	-Dcom.sun.management.jmxremote.ssl=false \
	-jar demo-0.0.1-SNAPSHOT.jar
These system properties are required to setup remote JMX. The extra RMI_HOST is a lookup function relevant to AWS ec2 that looks
up the hostname, you might just get by with listing the remote machine's public ip.
Notice that we are turning of ssl, but turning on authentication. We also create 2 files that define 2 self-describing roles:
jmxremote.password:
monitorRole 123456
controlRole 123456789
Notice the extra strong password we are giving the controller role 
jmxremote.access:
monitorRole readonly
controlRole readwrite
The role name will be the username, and we set relevant permissions and passwords for each one.
An additional step we need is to chmod +x run-public.sh and chmod 600 jmxremote.password.
Copy the files to the remote machine on ~/app. We are now ready for some remote JMXing:
$ ssh server
$ ./app/run-public.sh
Our application is running and also available for management. Let's now boot up JConsole locally. This time instead of using
local process, choose the "Remote Process" option, and enter <remote_ip>:9010 as the remote address, and our selected
username and password, controlRole and 123456789 if you haven't changed it.
You should connect, just as before, and get the overview information about the application. This is all working remotely, and we can use the MBeans to remotely diagnose and control our server.
If you've got this far, great success 
Our next step will introduce local port forwarding to bypass firewalls and also improve security, as we won't have to open up the port 9010 to the world.
Connecting remotely using local port forwarding
This connection strategy is almost a complete duplicate of the previous step, with a variation of creating a local port forwarding tunnel for which we'll connect to the remote machine.
Create a new file named run-tunnel.sh:
#!/usr/bin/env bash

set -euo pipefail

java -Dcom.sun.management.jmxremote \
	-Djava.net.preferIPv4Stack=true \
	-Djava.rmi.server.hostname=localhost \
	-Dcom.sun.management.jmxremote.local.only=true \
	-Dcom.sun.management.jmxremote.port=9010 \
	-Dcom.sun.management.jmxremote.rmi.port=9010 \
	-Dcom.sun.management.jmxremote.authenticate=true \
	-Dcom.sun.management.jmxremote.password.file=jmxremote.password \
	-Dcom.sun.management.jmxremote.access.file=jmxremote.access \
	-Dcom.sun.management.jmxremote.ssl=false \
	-jar demo-0.0.1-SNAPSHOT.jar
Notice this file is very similar to the previous run-public.sh excepts that it only listens for remote connections on localhost.
This has the added security benefits of not requiring us to open port 9010 on the security group. If you can ssh into the machine
you can connect to the remote JMX, which makes sense. If you can ssh in, you can probably do whatever you want already.
For this part to work, we will need to create a SSH tunnel to the remote host:
ssh -nNT -L 9010:localhost:9010 -L 9011:localhost:9011 server
Let's analyze this line, ignoring -nNT for now. We connect to our previously defined host server. Then we create
a port forwarding rule on our local machine, localhost, from port 9010 locally to port 9010 on the remote host.
We do the same on port 9011.
The addition of -nNT prevents us from actually connecting to the remote host (preventing TTY). Try it without it to see the difference.
Don't forget to connect to the remote machine and run ./app/run-tunnel.sh.
Now we can connect with jconsole, but this time, on the remote process address write: localhost:9010 and re-use the same
username and password from before (controlRole or monitorRole). It should work the same as before.
Great success again!! 
Concluding Thoughts
Well that was fun. The next steps would be off course to reproduce this setup on a server running in Docker/Kubernetes,
which is pretty much how anyone runs a server nowadays. Another experiment to run is to test how much of a resource drag
this setup creates on the machine as compared to running with jmxremote, and especially once you connect to the machine
to remote JMX.
A future article I want to dive in to, is running this alongside with Java Flight Recorder for the ultimate production setup, where you can inspect the JVM process not only when running, but also after it crashes.
Nowadays, APM tools such as NewRelic allow one to easily monitor their Java process remotely. They only require you to install their agent, and they take care of the rest. This solution is great if you have a lot of processes, and don't want to deal with the overhead of monitoring your systems. The downside is that you have to install their agent which might drain system resources, is usually unmaintained or doesn't support your current framework/setup, and is very expensive for a small startup.
Here is a gist containing most relevant files for this post.